My boys have been interested in Skateboarding for a while now. They want to be as good as their daddy, who can still wow me with his ability to ride his childhood skateboard!
I found this Skateboard for a few pounds and thought it would be fun for the children to paint it up.
With all four of my kids taking a keen interest in this project I drew squares on the skateboard and told each child that they could paint four squares each.
This meant that the overall piece had some cohesion rather than being reduced to a colourful mess. It also meant that each child could paint at their leisure as they knew the sections they were responsible for.
You can see from this picture that the end result is bright and cheerful.
Once the paint was dried I threaded some long lengths of rope through the holes above the wheels on the skateboard and tied them to some strong branches on our tree.
I did this on both sides making a swing that hovered just above the ground.
In hindsight it would have been better to have drilled holes in the skateboard and threaded the rope through the holes. This would have kept the board in place.
You can see from this picture the skateboard is now ready for any child ready to attempt some serious swinging.
If you are making this for any children under 5 you may want to add in handles so the child has something to hold onto. This may be as simple as knotting the rope so the child has something to grip. As it was, my children were fine to hold onto the rope, as you will see from the photos of Jack (below).
Jack had a wild time swinging, jumping and riding this new toy.
This was a fun summer time project and certainly kept the children busy making it and subsequently playing on it. That said, I am not sure if it would pass any health and safety tests so do it at your own risk!
Monday, 19 August 2013
Monday, 12 August 2013
Rainbow Biscuit Lollypops
Here are my three youngest children enjoying the Rainbow Biscuit Lollypops that we made today.
This is not my original idea so I will signpost you to the original recipe and hope you have as much fun making and eating them as we did!
Firstly we made the dough using this recipe.
3/4 cup of softened butter
3 oz cream cheese
1 cup of sugar
1 egg
1 tsp vanilla essence
3 cups of plain flour
1 tsp of baking powder
Lollypop sticks
Food colouring
Allow your children to mix the butter, cream cheese and sugar together. Then add the egg and vanilla. Once mixed add the flour and baking powder to form a firm dough.
The original recipe says only 2 3/4 cups of flour, but we needed quite a bit more to form a firm dough.
Divide your dough into four equal sizes. We found the easiest way to do this was to roll it out, and then Jack cut it in half and then each half into half again.
Now we were ready to dye the dough the colours that we wanted. I let the children choose what colours they wanted to use and as a result we ended up with some very bright (and slightly unsavoury) looking dough!
At this stage the dough looks remarkably like play dough and you might find that you want to let the children have time to play, mould, taste and enjoy the dough.
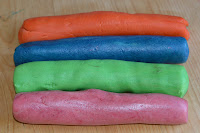
Here are the four colours that we ended up with. I tried a variety of liquid colourings and paste colourings to dye the dough. The paste colourings (which can be bought from any cake decorating shop) were so much brighter and needed far less colouring.
If you find that your dough is becoming sticky with all the colouring just add more flour.
At this stage we put the dough in the fridge for 20 minutes to firm it up a bit. Apparently this helps the finished biscuit hold it's shape. If you don't have time then I am sure it isn't the end of the world!
Roll the dough into long sausage shapes. This is best done by rolling from the middle of the sausage to the outside as you are unlikely to trap any air in the dough.
Pile the dough sausages together and squeeze and roll them together to make one long colourful sausage shape.
Now for the fun bit. Gently twist the dough by rolling one end towards you and the other end away from you. Carry on doing this until you are happy with how much it has twisted.
If you are finding you have too much dough then split it into sections and do a bit at a time. The final sausage should be 15mm thick.
Roll a small section of the colourful dough around in a circular shape to make a biscuit that looks similar to this.
Each of our biscuits were about 10cms wide once rolled.
Insert a lollypop stick firmly into the biscuit and cook in a 180 degree oven for about 12 minutes or until they are slightly browned.
Whilst these biscuits hold their shape and stay on the stick firmly once cooled, they are absolutely delicious warm and straight out of the oven.
We wrapped up some of our biscuits in plastic wrapping and ribbons and gave them away to the children's friends.
Monday, 5 August 2013
Face Painting
Today it has rained all day! So our summer craft for this week is face-painting, which has occupied us perfectly. I bought a cheap pack of face-paints from Snazaroo and set about transforming my children into tigers and monsters…here is how.
Jessie was keen to kick us off with a tiger. I began by painting the middle of her face yellow using the free sponge that came with the pack.
It is important to get the sponge and paint a little wet, but if you over do the water then the paint is too thin and can drip down the face.
The pack didn't come with orange so using the sponge I mixed yellow and red to make an orange that I sponged onto the rest of her face.
Once the face is covered you are ready to begin adding the features. I used white paint, leaving it as thick as possible so it wasn't translucent over the orange and painted it on with the brush that was provided.
I used the tops of Jessie's eyebrows to mark the bottom of the tiger's eyebrows meaning that they were straight on her face.
I find it much easier to get things symmetrical if I paint the left side of the face first. I am right handed so it means I can see the side I have just painted and mirror it on the other side. You will need to reverse this if you are left handed.
Finally, add black lips, whiskers and other details. Don't try and be precise when you do this. It needs quick hand movements that create much more fluid lines than if you spent a long time trying to be exact.
The small dots above her mouth were done with the wrong end of the brush by dipping it into the paint and pressing it gently onto her face to get perfect little dots.
No surprise, Jack wanted to be a monster!!!
Here I have painted the whole of his face with the sponge in a green paint.
Now I add the details of his eyebrows and facial lines. I tried to make a brown using a small bit of black on the red. As it turned out the red was fine to use alone as it browned once applied to the green.
Finally I add the details of teeth, lips, hair and a nose with the black. I used the paint brush, which gave surprisingly thin lines.
Jack jumped out at the other three kids who screamed so loudly I wondered what had happened. He was delighted to get this reaction and the four of them fell about laughing!
Billy wasn't as impressed with having his face painted until I told him I could try and paint the Liverpool Football Club badge on him!
I think I aimed a little too high. I found a clear image on the internet and set about copying.
Firstly I drew the badge with a slightly dodgy liver bird. Then added the green ribbon.
The details on the badge suddenly seemed terribly complicated so I added some curly lines and a yellow flame.
At this stage Billy is loosing interest, so I quickly write the word Liverpool and a few more details before he dashes off. I have to say this was too hard for me, but I didn't just want to do an England flag.
He was happy with it though and left singing 'You'll never walk alone!"
And now for Molly. She really wanted a butterfly and rather than painting her face the normal way people paint butterflies, I thought I would try a pretty but simple alternative.
I have used three colours on her face to begin. With the sponge I dap a small area on her cheek bones with pink, then dark green to her eye lids and light green/yellow above the eyebrows. Blending colours like the yellow and green are much easier if you use the sponge because you can just overlay one colour over another in a dabbing motion.
Starting with the left side of her face I painted a white line from the bridge of her nose, over her eyebrow and curled up. Then continue the line down the side of her face to the corner of the eye. Add on some large petal shapes over the pink cheeks.
Now repeat these shapes on the right side of her face copying the lines you made on the left. If you are left handed do the right side first then the left.
Finally I add the remaining detail. You can be as creative as you like, but again keep these strokes light and fluid. If I had glitter it would have been nice to include this on Molly's face.
We had a smashing afternoon doing this, and then the children thought it would be even more fun to paint my face. I gave the four of them 10 minutes each to paint a section of my face, and before I knew it they had covered me with a beautiful selection of flowers, beards, words!
I have just tucked them into bed, very thankful to God for the gift of four amazing kids.