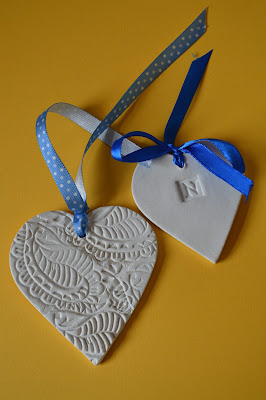
To finish off the 'Crafting with Children' summer series the girls and I have attempted some clay decorations that were actually quite fun and cheap to make. I am sure we will be repeating this activity nearer Christmas!
We used White Air-drying Clay that can be bought from any art shop. A pack is about £5, though if you shop around you can find it cheaper.
The children had to work the clay before it was ready. It didn't take long but you may want to help little children as it is much easier to work with the more you have softened it.

Once the clay is soft mould it into a ball and roll it out using a rolling pin. If you shape it into a ball shape first it is likely to have few, if any, cracks.
We rolled it to 5mm thickness and then lay a piece of cling film over the top.
Now we are ready to cut our shapes. You could just use cutters straight onto the clay, but in putting the cling film onto the clay prior to cutting the shapes will result in beautifully rounded edges.
Gently press the cutter over the film and through the clay.
You can see from this photo how well the cling film works in creating a smooth and well-rounded shape.
Once you have cut out your shape, gently remove the cling film and lift out the clay. You may need to cut the shape out again once the cling film has been removed as the cutter won't always go all the way through. Don't worry, this won't alter the rounded edge, but it is important to get a crisp cut.
 If you aren't pleased with your final clay shape then use the back of your nail to smooth out any lines or creases, and if still not pleased just start again!
You can just leave it as it is, or if you want to decorate your clay shape then why not use flowers, leaves, shapes, rubber stamps etc to emboss texture into your piece.
I am using a piece of lavender here, and later you can see that I have used a set of rubber stamping letters to push into a heart with the initial of someone for their birthday.
On this piece of clay we rolled a rolling pin over a leaf pushing the veins of the leaf into the clay which in turn left a beautiful imprint onto the clay.
I didn't want the rolling pin to skew the over all shape of the clay and so I cut around it with a sharp knife after the leaf was embossed.
I have forgotten to take a photo reminding you to put a hole in the clay once you are finished. Use a wooden skewer or knitting needle to push a hole into the clay shape. This will mean you can tie ribbons, string or even key rings through your clay to make them into usable objects. Do make sure the hole isn't too close to the side as the clay may not stand up
Once you have finished your shapes leave them on a baking sheet for 4-7 days. You will need to turn them over once a day to stop them curling.

Here are some of our finished clay hearts. The ribbons have been added for decoration.
They will make lovely little gifts that can either adorn a birthday present, or be a small gift in their own right.
We hope you enjoy making them…


Why not make the wholes with a straw. They are a lot more beautiful and round that way :-)
ReplyDelete